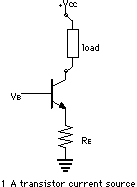
The crux of the remaining T-control electronics is then a circuit that will control current, given a particular input voltage. The most basic form of that circuit is the transistor current source (figure 1) as described in the electronics bible (Horowitz&Hill "The Art of Electronics") Chapter 2.06, and based on the all-powerful equation (depending on ICE>>IBE).
ICollector = (VBase-0.6 Volts) /REmittor
In principle, all we need from here on are some feed-back op-amps or voltage dividers to get the input signal to the right range, plus added extras to allow for the rather large current (~6 Amps) and some filters for stability etc.
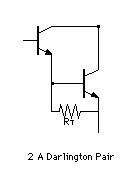
For large currents (and our aim of 6 A is large) it is standard and good procedure to use a Darlington pair of transistors (figure 2), rather than a single one, which effectively acts like a single transistor with a ß that is the product of the two ßs of the individual transistors.
(A transistor's goal in life is to put out a collector-emitter current that bears a linear relationship to the base-emitter current, the constant of proportionality being ß. ß is not a good constant, however, and for precise control should generally just be "large (compared to 1)". It generally stops being large when the power supply across EC cannot provide a high enough current or the transistors ratings are exceeded).
If for large currents ß is not much larger than 1, i.e. the basic assumption that ICE>>IBE will hold no longer.
Note that the resistor RT between the two transistors is required to switch the second one (which bears the brunt of the current) faster. If you switch the first transistor off with no resistor present, the second one will remain high until its small IBE current has drained the base voltage. That's the slow process.
Point to note: These transistors will dissipate heat. Thus they will want to sit on a heat-sink. Traditionally one holds them in place with little nylon screws. On the bigger transistor these tend to melt, so use metal screws with insulating washers instead.
Number one gadget for current stability and easy input voltage output current conversion is the use of a feedback loop from the emitter of the transistor to some op-amp with the input voltage going into the other side (figure 3). The output voltage of the op-amp will then adjust in such a way that
IEmitter= Vin /RE
(see 4.07 H&H)
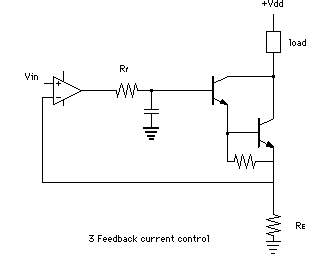
One can put a resistor between the amplifier output and the transistor base, to make sure that the base current of the transistor really is very small compared to the Collector- Emitter current. Note we are regulating ICE+IBE, while ICE is what we are really interested in. Again, if IBE is very much smaller than ICE, that comes to the same thing. Realistically speaking, given a Darlington which has a massive ß, the condition IBE<<ICE will be true with or without a resistor, but they are cheap so lets add one just for the heck of it. And there is another reason why it won't do any harm: We want to avoid the amplifier picking up any stray AC signal and adding noise on our current control. Thus we put a capacitor between ground and the op-amp output. Now a perfect op-amp has infinite current output to achieve the desired voltage, so the capacitor will be ineffective. Thus we add a resistor Rf, to slow down the voltage swings behind it and give the capacitor a chance to filter. The combination is just a standard low-pass filter as explained in H&H.
Another plus is the fact that if the transistors get fried and short out the amplifier output, the maximum current the amp will try to provide is Vsource / Rf, which won't harm the amplifier or sink the power-supply for Rf = 1 k.
Note that for silicon transistors, the base-emitter reverse breakdown voltage is small (often as little as 6V -see 2.03 H&H), so one needs to take care that the input signal to the Darlington does not go too negative (Not sure if we are using such transistors). Either one can add a diode (DAH 3&5 and J. Strzalka 3) or one can run the op-amp from ground rather than from -15. As the transistors will shut off at a diode drop across the base, i.e. when the op-amp output is 0.6 V, we won't have any problems from the op-amp not being able to go negative without a negative source.
The amplifier control is based on all current flowing through the power resistor, which will thus dissipate a lot of heat. To keep that manageable, we use a small resistance RE. It is also crucial for voltage current linearity to use a precision wire-wound resistor, with a small temperature coefficient. Previous designs have worked well with 0.1 W, which gives a power dissipation of 3.6 Watts at 6 A. This means that the input voltage needs to range from 0-0.6 V for the 0-6A range. The Octagon puts out 0-5 V, so we need to reduce that, either using inverting op-amps or a voltage divider.
As a fail-safe mechanism, we want to have some hardware that pulls down this input voltage Vprog to zero, if a temperature sensor exceeds a certain value, i.e. if a platinum resistance thermometer (RTD in the sensible US abbreviation) reading Vtemp exceeds a reference voltage Vref. We can use an amplifier to compare voltages, the reference voltage being set as required by an adjustable resistor on a voltage divider. The output from that amplifier can then turn on a couple of transistors, one to ground the input voltage Vin of the current source, the other to power a warning LED (figure 4). Again it is sensible to power this op-amp from ground, as we never want a negative output. However, this only works if neither of the inputs ever go negative. Op-amps do strange things if the inputs are outside the source-range. Such as drawing a lot of current on the inputs and putting them both at the same (negative) level (i.e. shorting them). As the temperature sensor voltage has a tendency to go negative (not sure if that is in normal operating or just when the power-supply goes weak) this can - and did - cause havoc, so we are better off running this op-amp from ( 15 V, which are the technical limits on the inputs, too. These little transistors can hold negative base voltage quite well, apparently (blame Sandor Barna if something goes wrong).

Another point to note is the resistor in line with the overheat LED, which is required to limit the current going through there, when the LED comes on. That again can (and did) otherwise cause a weak power-supply to drop.
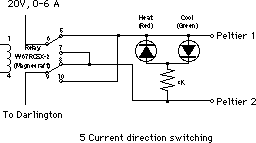
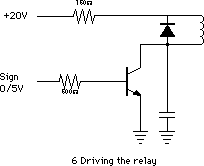
Another feature we need is adjustment of current direction through the Peltiers. We do this using a double relay and add some light diodes to make it pretty (see figure 5).
A relay draws a significant amount of current, so we use the digital signal from the Octagon to switch a transistor which drives the relay, adding a resistor to stop us pulling too much current from the Octagon output, even though that is probably not necessary, as the base current across the transistor will of course be very small (until the thing fries). One also puts a diode across the relay coil, to protect the rest of the circuit from voltage spikes as the coil is turned off (figure 6). That spike is also tamed by the capacitor.
A few references to previous designs by the group. The Brody diagram (PM TC-Box, p 100 big black schematics book) suffers from no feedback mechanism controlling the Darlington pair, even though apparently it has worked well for a long time. D. Hajduk's (DAH#5 p.120) and J. Strzalka's (J. Strzalka#3 p.117) design have feedback. Missing here is the added resistor in the Darlington pair, that will stop the input of the second transistor from floating if the first one is off, and thus is required for fast turn-off. Brody or someone later has obviously also stumbled across the problem that the relay draws a lot of current. The original drawing has been modified to run from the 20 Volts supply. This fault remains in Hajduk's drawings, which also has LED resistors missing all over the place. Either those points were modified without changing the drawings, or his T-reading power-supply was constantly failing.
Another feature of previous designs is an adjustable resistor in the feedback mechanism for the Darlington pair. This is included to assure that a badly chosen input voltage on the op-amp can't set the current going through the system too high. Can economize here, think about the maximum input voltage well and instead add a quick blowing fuse into the path of the heaters, which is a good idea, anyway. That resistor off-set is probably the cause for the lack of thermal response at small Vprog by the way, which was investigated by S. Lee at length in his analysis of the T-control systems.
The 0-5 Volt signal provided by the Octagon to set the current is sent out on socket DA0 and should be connected to socket Vprog on the TC-box.
The current sign as well as the various Manual Temperature setting switches are all included in the 24 pin ribbon connector labeled J3 on both.
It also has an input for the 6 Amps power supply providing the current.
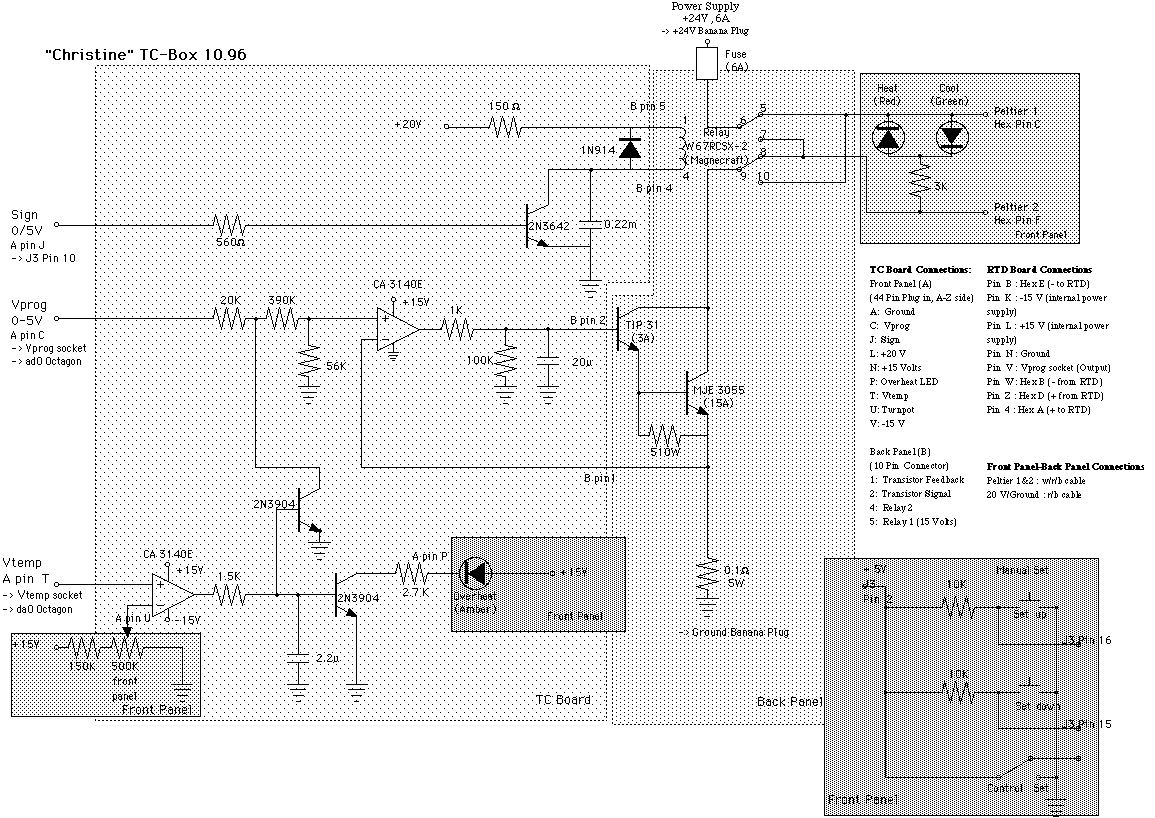
And the whole thing is summarised here: Schematic of the current control electronics